Adobe Photoshop Tutorial:Orton Effect
Here’s an easy Adobe Photoshop Tutorial to help you add a soft glow to your images using a digital Orton effect, with step-by-step instructions.”>
Adobe Photoshop Tutorial:
Orton Effect
Here’s an easy Adobe Photoshop Tutorial to help you add a soft glow to your images using a digital Orton effect, with step-by-step instructions.

Spread the joy! Share today’s tweetable!
Video Transcript
Are you interested in learning a new Photoshop technique that will give a nice glow to your image? Nothing over the top, I promise!
Hi, I’m Julie, from Ultimate Photo Tips, and having recently returned form New Brunswick Canada, and seen Canadian photographer Freeman Patterson, I am inspired to share with you a technique that I learned from him many years ago. It’s called the “Orton effect.” Now, in the old days (and I can’t believe I’m saying the “old days!”), the Orton was done with slide film. You would take two slides of the exact same subject: one that’s completely in focus, and one that’s a little bit out of focus, and you’d sandwich them together. The out of focus slide will give a bit of a glow to all the elements in your photo.
Today, that’s really easy to do digitally using Photoshop. That’s what I’m going to share with you today. Without further ado, let’s dive right in.
Alright, here I am in Photoshop with my image ready to go. This technique that I’m going to show you will work in Photoshop CSx or in Photoshop Elements. So, I’ve got my image with any of the basic adjustments that I want in contrast, etc., and it’s ready to apply my Orton technique.

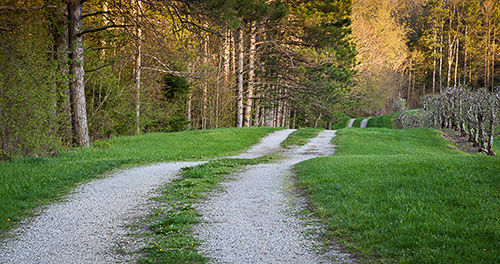
Before – this is our starting point.
© Julie Waterhouse
Step 1. Duplicate the background layer. The first thing I’m going to do is duplicate the background layer. So that’s Command+J or Control+J, depending if you’re on a Mac or a PC. So, I’ve duplicated my layer. Now, I like to name my layers, so that if I go back into the file later I know what I was doing. So, I’m going to rename this layer “Orton,” because that’s the technique we’re applying.
Step 2. Blur the top layer. An Orton really involves creating a blurred layer, and then blending it in with the layer underneath. So the first thing I’m going to do is go under the Filters [menu] -> Blur -> Gaussian Blur. I’m going to blur this layer. Now, you can see from the preview that’s showing that I’ve only got a very small radius. It’s not much of a blur right now. For this technique, I actually want to create quite a lot of blur. I’m going to increase the radius quite a lot, somewhere into the 20’s. The number you pick is completely personal taste. It’s going to affect how much of a glow effect you get in the final image. You really need to experiment and decide what you like. I like something like this (~24) so I’m going to choose this and say “OK.”
Step 3. Switch to Soft Light blend mode. Obviously we don’t want our final image to look all blurry, so the next step we have to take is to blend this layer with the one below. So, instead of a normal blending mode, which means that this layer is opaque and that’s all you see, I’m going to choose a soft light blending mode.
What soft light does is that anything in the current layer that is 50% brightness or greater blends with the layer below to make it brighter; so bright things get brighter. Then, for 50% brightness or less, the darker things make the layer below get darker. But just in a soft and gentle way.
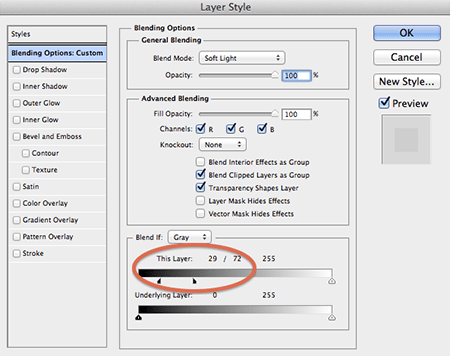
Step 4. Use the Blend-if slider. Alright, so I’ve almost finished. But there is still a bit of a problem with this, and that is that the dark parts of the image (here, here, across the top), have gone very dark, and completely blocked up the shadows. I don’t want that. To correct that, I’m going to go to my Orton layer and double-click it to open up the Layers Style dialog. What I’m going to play with is this “blend if” slider down here.
if I move this triangle on the black end up a little bit, watch in the image what happens to the dark areas when I move it back and forth a little bit. These are brightness values from dark to light. What’s happening is that everything to the left of this triangle — the very darkest areas — becomes transparent. So the top layer is no longer blended with the bottom layer in the darkest areas. That’s going to help us recover some of that shadow detail. I’m going to start it just at the point where it starts to have an effect.
Step 5. Split the triangle. Now the problem that we have is that we have some pixels in the top layer that are transparent, and some that aren’t, and a very hard transition between them, so there’s a noticeable edge. We don’t want that either. The next thing we’re going to do is we’re going to hold down the Alt key while we click on the little triangle, which splits it apart. Then we can drag the top part up a little bit.

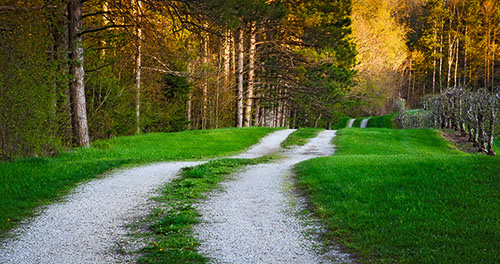
After applying the Orton Effect
What that’s doing is that all the value to the left of the triangle are transparent. All the values in between where I’ve split it transition from transparent to opaque. And then everything to the right of this triangle is opaque. So the brightest things do blend through with the bottom layer. So, I’m going to say “OK” to that and you can now see our final image with the Orton effect applied.

After applying the Orton Effect
© Julie Waterhouse
Now, just to show you what that slider was doing, I’m going to turn off the background layer. You can see that in the darkest areas, this top layer is completely transparent, so only the bottom layer is showing through, and we’re not blending in anything from the top. And then there are some areas that are partially opaque. That’s where we’re blending through a little bit of the top layer. And then in some areas we’re blending the entire top layer (i.e., at 100%). Those areas are the brighter areas.
When I put my background back on, now you can see the final image. Now, just to show you the before and after, I’m going to turn on and off our Orton layer. So this is our “after,” and this is our “before.” You can see that when we put our Orton layer on, it really just makes the colors seem richer, and we get a quite warm-looking glow to the image. So that’s the Orton effect. It’s time for you to go and try it out on some of your images.
So I hope you enjoyed that, and you’re ready to try it out on some of your own images. For more fun photo tips, please stop by ultimate-photo-tips.com, and make sure to sign up for my newsletter while you’re there. That’s where I share ideas and inspiration that I don’t share anywhere else.
Happy shooting, and I’ll see you next time!