Digital Photo Books
Here are some hints and tips so that you can create digital photo books that wow! Find inspiring topic ideas, and learn how to choose the right images, lay them out on the page, and more.
Advantages of Creating Digital Photo Books
First and foremost, creating your own photo books is fun! It’s exciting to go through your images to choose favorites, and extraordinarily satisfying to see them come together in a professional-looking finished product. To me, a photograph is not a final product until it is in printed form.
In the digital age, we tend to take lots (and lots!) of pictures, but print very few.
Photos get lost and forgotten, languishing on your hard drive. Digital photography books are a great way to resurrect the old photo albums but with a modern and more sophisticated twist.
Photo books are a great way to show off your images to family and friends that they will enjoy much more than sitting though a long slideshow in your laptop! Creating a book forces you to cull your collection, choosing only the best of the best, and presenting them nicely in a portable, easy to handle way. This will definitely please your audience!
Another advantage of photo books is that you can make several copies to share with family and friends!
What Should Your Book Be About?
There are endless possibilities for subjects for your digital photo books. What will make your book stand out, however, is giving it a coherent theme, rather than making it a random collection of pictures. A good photo book does more than present images; it tells a story. Try to find a thread that you can weave through the book so that the pictures relate to one another.
Here are a few ideas for themes for your digital photography books.
Memory Books
- Vacations. Making a photo book about your vacation is a great way to capture and share your memories. It could be an exotic trip, or it could be Summer life at the cottage.
- A Person. You could make a retrospective about someone’s life, or you could document a year in the life of a child.
- A Child’s Perspective. Create digital photo books with a child from photos that they have taken themselves, for example on a trip to the zoo or a family vacation. Involve the child in choosing and arranging the photos for a fun collaboration.
- Family. Choose photos to represent everyone in the family doing their favorite activities, interacting with one another, and participating in important family gatherings. Make sure to print a few copies, as everyone will want one!
- Your Pet. A book with pictures of Fido or Whiskers is always popular, and a wonderful way to honor and remember an important member of your family!
- Recipes. If you are a cook as well as a photographer, take some photos of your culinary creations, and include the recipes with them in the book. This one makes a great gift for friends, or to pass down to your children.
- An Event. Choose a set of photos to commemorate a wedding, a shower, or a birthday party.
- A Relationship. A great gift for your partner, your photo book can include photos of places you’ve been and things you’ve done together. Get creative, and scan in movie tickets, maps, brochures, and other mementos, to accompany the photos.
Fine Art Books
- Your Passion! Flowers, landscapes, nature, urban architecture, rusty cars, city-scapes... what’s your "thing? Your subject can be anything that you are passionate about photographing.
- A 365 project. If you are doing a 365 project (taking a photo every day for a year), a photo book is a great way to document the finished product. You can put 7 images on each page so that a page represents a week.
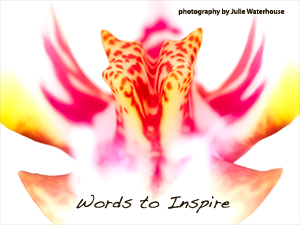
- Favorite quotations. Pair a (themed) collection of your images with quotes. This is something I did, pairing my close-up flower photography with inspirational quotes from great thinkers.
Making it Look Great
Choosing Images
The most important factor in making your digital photo books look great is selecting your best photos. That may sound obvious, but it’s not always easy to do. One of the hallmarks of a great photographer is being able to edit your work. You need to be really tough on yourself. It can be difficult to separate the emotion you felt in the moment of taking the photograph with how successful the resulting photograph actually is. Sometimes, it helps to choose a few images, and then walk away and come back later with a fresh perspective. Edit, edit, edit. Keep on brutally narrowing it down until you’re left with the cream of the crop.
Remember how we said that a good photo book tells a story? An effective way to do that is by selecting a mix of overview pictures, medium close-ups, and close-ups. In a good story, you first set the scene with an overview image, then you move in closer to describe more of the "plot," and finally, you include some interesting details that people might otherwise overlook. In your digital photo books, you might have a single progression from overview to details, or you may move through that pattern rhythmically a few times.
If there is a chronology or an evolution to the images, make sure you include them in that order.
And did I mention? Be a brutal editor!
Designing Pages
Once you’ve chosen your images, you need to lay them out on a page. Most of the companies that produce digital photo books provide tools and templates to help you choose themes, page styles, and background colors to achieve a polished look.
You may want to have a very simple layout with a single image on each page. Especially if you are creating a fine art photo book, a simple layout keeps the attention on the pictures. You want people to be looking at your photographs, not the embellishments on the page.
On the other hand, stories can work well with groupings of images, and a less formal layout and background style can add fun to a memory book.
When you are selecting which pictures to place together, choose colors that complement one another. If the colors are similar, you will achieve a more soothing and harmonious look. If they are opposites, you will generate energy. What works best depends a bit on your story; just make sure to give it some consideration.
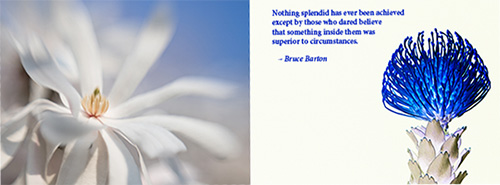
© Julie Waterhouse Photography
An example 2-page spread from my book of quotations.
I paired a close-up with a medium distance shot, and
selected images with the same color palette.
Also, don’t forget that when you open a book, you see the left and right pages at the same time, so make sure that the photos on both sides flow together well.
Finally, you may want to add text to your photos in the form of captions or descriptions. If you do so, I recommend
keeping the font consistent throughout the book for a more unified and polished look.
Cropping
Not all applications for making digital photography books allow you control of how your image gets cropped when you place it within a template. Make sure that if you are not designing your own pages from scratch using an application like Adobe Photoshop or In Design, that you choose your images carefully to match the available space. Think about whether a photo in portrait or landscape orientation will work best, and pay attention to what, if any, parts of the image are cut off. Some photo book applications allow you to move the image around within the frame window.
Consider whether you will create your digital photo books in portrait or landscape orientation. Landscape seems to be more common, but portrait has its advantages. You can place a landscape image into a portrait-oriented book as a full two-page spread.
Color Management
Is "calibrate monitor" a regular on your todo list? If you are not working in a color managed environment, keep in mind that what you see on your monitor may not be what you get when you print your photo book. If you don’t want to bother with calibration, then you’re probably best off to err on the side of making your images look a little brighter, since they often tend to print darker.
If you are working in a color managed environment, then see whether the publisher/printer for the digital photo books provides a color (ICC) profile that you can download and use to soft proof your book.
Tips
1. To avoid working online, which can be slow depending on the speed of your connection, many digital photo book companies allow to download their software and create the book offline, on your own computer. You can then upload the finished product.
2. Edit your photos in your own software (such as Lightroom, Photoshop, or Aperture) before including them in your book since most book production software is fairly limited in terms of photo editing. If you do this, then also remember to turn off any image auto correction settings in the book-making software.
3. To get an idea of what works in terms of layouts, check out other people’s books. Learn by seeing what works, and what doesn’t. You can find examples online at many of the companies that produce digital photo books.
4. Share a draft of your digital photo books with a trusted friend or three before you publish it to get some constructive feedback. It’s much less costly to fix things before you’ve sent a batch to be printed!
5. A somewhat sneaky way to get a discount on your digital photo books is to download the book-making software, and then wait some time before you send a book to print. Not always, but quite often the company will send you a discount coupon to encourage you to complete your book.
6. Creating a photo book is an excellent learning exercise for any photographer. After you create your books, you will revisit them many times, and you’ll continue to learn and improve with each new one.
***C2_invitation_27358957***