Learn a new approach to portrait poses that is guaranteed to make your subject love their pictures! Become the master of illusion to hide a multitude of sins, and bring out the best in your subject.
In Part I, we talked about techniques to minimize the appearance of asymmetry and irregularities in your subject’s face, thereby making them look more attractive.
In this section, we talk about the best positioning of your subject’s body relative to the camera.
Positioning Your Subject
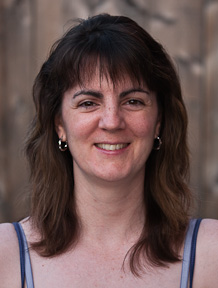
Shooting your subject straight on, square to the camera, is generally not a good idea. Head on portraits are very direct, and can sometimes take on a confrontational appearance.
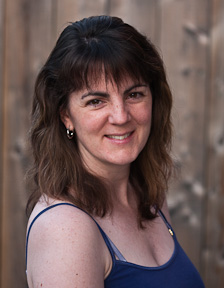
It’s better to angle the shoulders, rather than shooting them square on. The shoulders take on importance in the image simply by because the head, which is the main focus of the portrait, sits on top of them. They also gain visual weight from being the widest part of the body. Since we don’t want all the attention to go the shoulders, we want to minimize their visual impact by turning them to make take up less visual space.
Another benefit of angling the shoulders is that it can lead the viewers eye into the portrait and toward your subject’s face.
 Portraits shot straight on are often unflattering. © Peter Ainley |
 The portrait is more engaging when the subject leans toward the camera. © Peter Ainley |
When you are leaning toward someone, it conveys interest and a sense of engagement. To engage the viewer of your portrait, have your subject lean in toward the camera, and drop her front shoulder. To give a similar impression, photograph your subject from slightly above, so she is looking up into the lens.
 Portraits shot from below are unflattering. The subject can appear distant or unapproachable. © Peter Ainley |
 When you shoot from below, you get an unflattering view into the subject’s nostrils! © Peter Ainley |
Never photograph from below. You don’t want to be shooting up into someone’s nostrils!
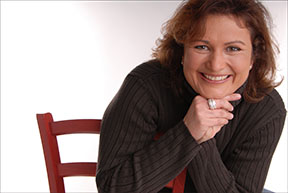
A relaxed subject looks natural, not stiff. To help your subjects relax, make them comfortable. If you can, shoot them while they are seated. The best position is to have them sit backwards on a chair so that they can lean on the chair back. Make sure the chair back is not too high, so that you can get that "lean-in" pose.
Check out this great, relaxed portrait of my friend, made by photographer Thilo Vogel.

Subject leaning on the back of a chair gives a relaxed pose.
© Thilo Vogel
If the subject must stand, again, try to give them something to lean on. have them place their weight more on their forward foot so that they are leaning toward the camera.
A few more tips on portrait poses…
If the subject is standing, then twist the upper body slightly at the waist. This will make the waist appear slimmer.
To minimize the appearance of the thigh, cross one leg over the other.
Arch the back to emphasize the chest.
Don’t overdo any of these, and don’t do all three at the same time. Your subject will look silly, if they can even stand at all!
Review portrait poses: Part I.
Or, you may want to visit the next section on portrait lighting.