Resizing Photos
Looking for some useful digital photo tips? We unravel the confusion around resizing photos. How is image size related to resolution and to file size? How do you resize an image to print or email?
What is Image Size?
The confusion around image size comes because the term is overloaded. It is used to refer to two different things.
Image size can refer to the amount of data the image contains, in other words, its resolution, or how densely packed it is with pixels.
Image size can also refer to the physical size of the output document, e.g., a 4"x6" print versus an 8"x10" print.
I’m going to walk you through Photoshop’s Image Size dialog to explain these concepts of resizing photos. This will help your understanding even if you don’t use Photoshop.
Resizing Photos: Document Size
Resizing Photos: Figure 1.
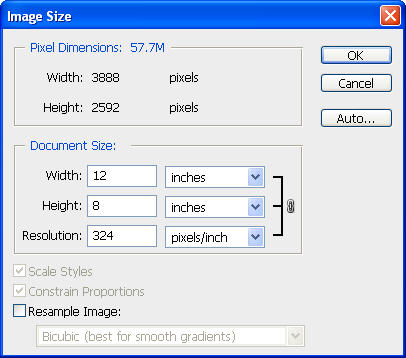
In Figure 1, let’s look first at the Document Size. The dimensions of the image are 12 inches by 8 inches. This is the size that the document will be if I print it.
Now look at the resolution. It’s 324ppi (pixels per inch). The resolution and the document size together give us the corresponding width and height in pixels. Let’s do the math. 12 inches at 324ppi equals :
12" * 324ppi = 3888 pixels wide.
Hey! That’s what our dialog says too. And the height is:
8" * 324ppi = 2592 pixels high.
With me so far? Okay, there’s one more number at the top of the dialog: 57.7M. What’s that? That tells you how big the file is going to be on your hard drive. How do we calculate that number? Well, it’s based on the total number of pixels in the image, so first we find out what that is. That’s just width times height in pixels, or
3888 * 2592 = 10,077,696 pixels.
That number is about 10 MegaPixels, which is the resolution of the Canon 40D camera that the photo was taken with.
Almost there! Now we need to know the bit depth of the image, or the number of bits stored per channel. Red, Green and Blue (RGB) are the three channels. This happens to be a 16 bit image. That means I have stored 16 bits of information for each color of each pixel. In other words, I have 16 bits for Red, another 16 bits for Green and another 16 bits for Blue. So I have:
16 bits * 3 channels(RGB) = 48 bits per pixel
Last bit of math now!
10,077,696 pixels * 48 bits per pixel = 483,729,408 bits
That’s in bits, so now divide by 8 to get bytes.
483,729,408 bits / 8 bits per byte = 60,466,176 bytes
Since a KB is actually 1024 bytes, not 1000 bytes, divide by 1024 to get KB, and again by 1024 to get MB.
60,466,176 / 1024 / 1024 = 57.7MB
Whew! Got there at last! That’s where the top number in the dialog comes from!
Resizing Photos: Image Size
Resizing Photos: Figure 2.
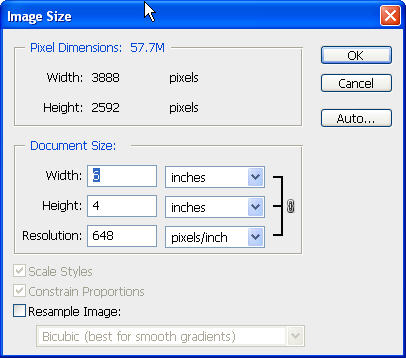
Next, let’s look at changing the image size. Suppose we want to make our image smaller. In Figure 1, our image was 12"x8". In Figure 2, we’ve halved the image size to make it 6"x4". Since the "Constrain proportions" checkbox is checked, both dimensions are forced to scale down by the same amount. Note that our pixel dimensions have remained the same. We still have 3888 pixels along the width. That implies that our resolution has now changed! Where we had 324 pixels per inch before, we now have twice as many: 648 pixels per inch. We kept the same number of pixels, but cut the size in half, thereby doubling the resolution.
Resizing Photos: Resampling
Resizing Photos: Figure 3.
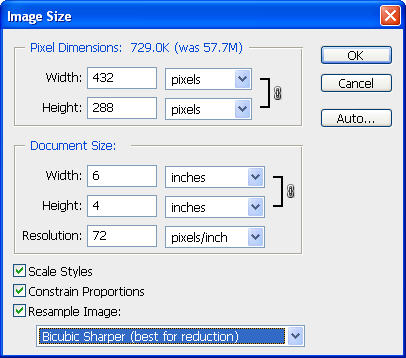
Now, let’s imagine that we’re interested in resizing photos to send them by email. A 57.7MB file is too big! We want to lower the resolution, but we still want a 6"x4" image. To achieve that, we must resample the image. Changing the pixel dimensions of an image is called resampling.
Tip
Resizing pictures:
It is recommended to use the resampling algorithm “Bicubic sharper” when reducing your resolution (down-res’ing), and “Bicubic smoother” when increasing your resolution (up-res’ing).
If we check the "Resample image" checkbox, our pixel dimensions now become editable. Let’s just change the resolution directly and see what happens. Let’s take it from 648 ppi down to 72 ppi. That means we’ll have the same number of inches (still 6"x4") but a lot less pixels per inch. At 72 pixels per inch, we now have only 432 pixels wide, instead of 3888. Obviously, we’ve now thrown away a lot of information, and this low-resolution version of the image does not contain as much detail as the original.
Note that the file size (top of the dialog) is now only 729KB, though. This is much more appropriate for display on the web, or emailing.
Next, you may want to visit another digital photo tips page to learn about RAW vs JPEG file formats.